Day 3 - Agenda
1. Sign in/Housekeeping/Q and A
2. Debrief/Updates
LHS Tech page - instructions for tools: http://leilehuatech.weebly.com/helpful-links.html
Follow up on Popplet Questions
*5 popplet limit, but if you contact them, they might add more. Workaround - sign up with different email accounts - maybe by course?
*If someone shares a popplet with you as collaborator, you can add, but cannot change anything the others did
*No limit on collaborators
*Presentation mode: settings - view - presentation choices
*Popples only come in one shape
*Maximum file size of popplet? I am waiting for their answer.
*Popples can be sequenced - see settings
*Other - quizlet is coming - Quarter 4 by Maria A
*Other - prezi is a similar web 2.0 tool good for presentations
3. Introduction to piktochart
4. Meeting Reflection
Homework: think of a project/assignment that you will be doing in the next couple of months that you might be able to use piktochart as the student product.
Next class: Monday, March 6, 2:45, Library. Topic: Thinglink.com Designing a lesson, rubrics
Piktochart.com
|
What is it?
* an 'infographic' maker - fancy phrase for communicating information visually :) through 'long form' infographics, posters, presentations and flyers * add text, images, videos, documents *premade templates that are arranged by categories *good FAQ section Who can use it? * an individual and then shared with others * used by a group (with access rights) to share ideas and collaborate. What are some limitations? (free version) * 6 basic themes * Limited customization * only 10 slots for image How do I start? NOTE: According to website, works best in Firefox or Chrome 1. Go to piktochart.com 2. Sign up for a free account 3. Open piktochart.com and select what you want to create - info graphic, poster, presentation or report 4. The free templates are shown - you may need to scroll down. Note: the Lite/Pro templates are not free :( 5. You can preview the product before creating 6. Click on Create to start your project. 7. The menu bar appears on the left. Add graphics and words, resize, delete, etc. 8. You can rename it (at the top) so that its name shows up as part of the url. 9. Click on 'share' to create the url. 10. You can save it as a .png or .jpeg or .pdf file 11. Your account settings can be accessed at the top right drop-down from now on. 12. The templates that were previously under 'Reports' and 'Posters' can now be found under 'printables'. |
What are some possible applications?
Instructional Tool * Graphically introduce a new unit * Effective way to showcase charts and maps Student Product * Create a visual on a topic * Great for compare/contrast * Save as a .jpg or .png and print as a poster Tips and Tricks 1. Select a pre-made template to start (it's easier to start with) 2. Use the menu bar on the left 3. You can choose to upload a file, find a link to a picture from google images or pixabay.com, then resize to fit the area 4. If you screen shot pictures and save to your desktop, you can then upload without worrying about internet connection. Saves time! 5. If you want to capture the entire poster, have students save it as a .png. When you receive it, you can enlarge it to read. To reduce the poster being blurry, download it as blocks. It will save in a zip folder, and you can print the one block a one page poster. |
Teacher Notes
1. Provide time for students to sign up for account. 2. "Level up" means buy the upgraded version 3. Provide students a sandbox (practice) activity before starting real project - they will feel more comfortable with the tool - could be individual or group. Have them share the url with teacher, so that you know they know how to do this. 3. Have students complete a planning sheet to help them focus on content. Then time can be spent on creating an effective visual product. *Storyboard planning sheet 4. A rubric provides clear expectations. Consider a weighted rubric for visual products. 5. Require at least one citation for an image (since it is a visual product). If they copy the url into citationmachine.net, it will automatically create a citation for them to copy and paste. 6. Two ways the students can share their final product with you: *email you the url for you to view online *email you a .png/.jpeg/.pdf |
Student Instructions you may want to include.
1. Think about which images and words would best communicate your message. It is a visual product, which means that the pictures are as important as the text. 2. Choose your words wisely – since this is a visual product, the few words used need to have the most impact. 3. If you are showing a process use the a template that has the steps |
Additional Information
How to create a slick Infographic with Piktochart
Inventing Infographics: Visual Literacy Meets Written Content
Beyond the Book: Infographics of Students' Reading History
Piktochart Reviews- (provides tips, pros/cons)
How to create a slick Infographic with Piktochart
Inventing Infographics: Visual Literacy Meets Written Content
Beyond the Book: Infographics of Students' Reading History
Piktochart Reviews- (provides tips, pros/cons)
|
|
|
|
Piktochart Samples
|
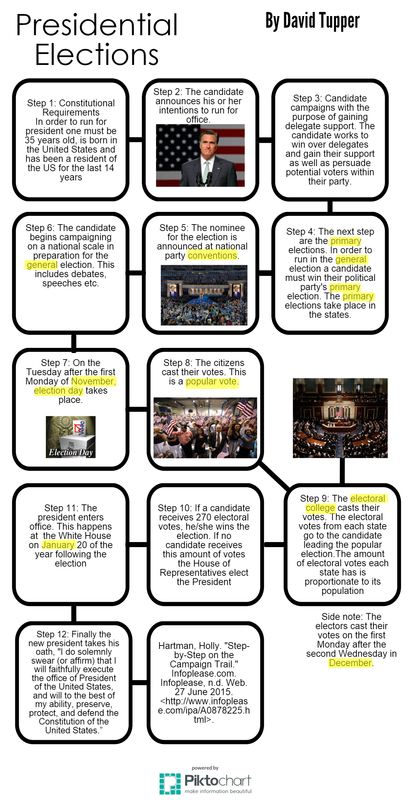
Student Work - Met
*used own wall paper appropriate to the topic *all requirements met (appropriate portrait with title, student name, Works Cited) 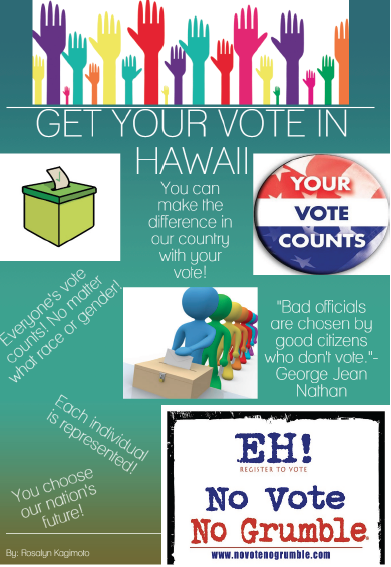
Student Work - Met
|
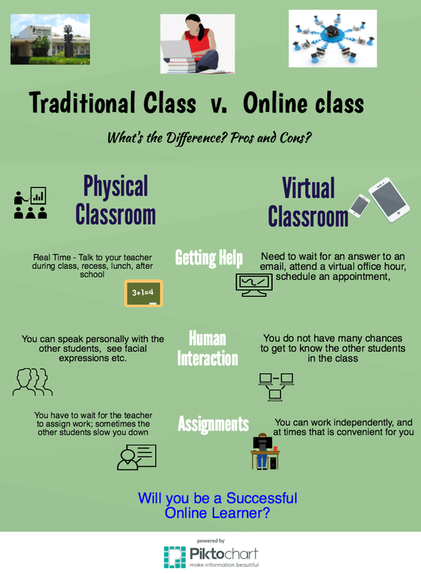
Student Work - Approaching
*while requirements met, too much white space *not particularly attractive *font is not large 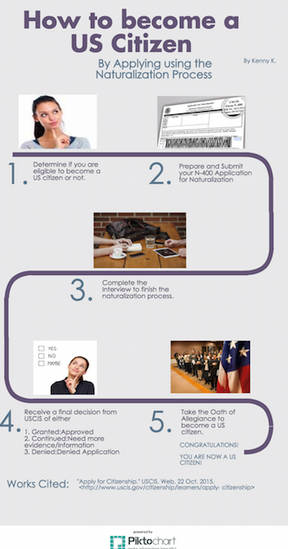
|
Sandbox Activity - Let's Practice!
Plan Your Piktochart
Use planning sheet to help you organize your thoughts and plan of action
Find and save images to desktop and note at least one image url
Create Your Piktochart
1. Create your piktochart account
2. Login to create a new visual
3. Create a piktochart. Some ideas:
*Upcoming event
*Compare and contrast
Piktochart Requirements
*Title and Your Name
*Include an image, video, audio
*Space your information so that 'white' space is minimized
When you are done, send me a copy of your piktochart. This can be done:
*send me a url link via contact box in the homepage of this course
*save as a .png or .jpeg send as an attachment to me ([email protected])