Day 1 - Agenda
1. Sign in/Housekeeping/Meet and Greet
2. Introduction to course and course requirements
3. Pre/Post Assessment
4. Introduction to padlet
5. Practice
5. Meeting Reflection
Next class: Monday, February 6, 2:45, Library
2. Introduction to course and course requirements
3. Pre/Post Assessment
4. Introduction to padlet
5. Practice
5. Meeting Reflection
Next class: Monday, February 6, 2:45, Library
Padlet.com
|
What is it?
* virtual bulletin board to share information * add text, images, videos, documents * can be used as a collaborative tool * formally known as"Wallwishers" Who can use it? * an individual who then shares with others * used by a group (with access rights) to share ideas and collaborate. What are some limitations? (free version) * Tile format is limited * Tile colors, fonts are limited * Pay version (Premium Plan) Information and Pricing 30-Day Free Trial (hint hint!) How do I start? 1. Go to padlet.com 2. Sign up for a free account 3. Open padlet.com and click on "new padlet" (top right) 4. Open Command bar in padlet (right side). You can customize: *Select wallpaper *Add title and description *Add graphics and words *Resize, delete, etc. *Additional information, click here |
What are some possible applications?
Instructional Tool * A menu board for your lecture. Click on tiles that may include pictures, videos, etc. * Gallery walk to showcase student work * Review for a test by posting questions and clicking on them Student Activity * Collaborate with each other by posting tiles * Set up to be a running blog Student Product * Create a poster on a topic * Size the poster to view on one screen, then screen shot and print (no more glue sticks!) Tips and Tricks 1. Double click anywhere on the wall to open up a tile. 2. You can add a title, text and image all in one tile. Resize for better viewing. 3. You can choose to upload a file, find a link to a picture from google images. 4. If you screen shot pictures and save to your desktop, you can then upload without worrying about internet connection. Saves time! 5. Convert a youtube video so that you can show it in school with keepvid.com. Thanks for tech team for these instructions! 6. Share the padlet in a variety of ways. The most common: have students share the url with you - this allows you to open the padlet; however, you are also given permission to add new tiles (padlet was originally used as a bulletin board tool, so this is a remnant of that). You can also have them save it as a .pdf file - which will give you the contents, but it will not show up as padlet. See my sample on the portfolio page. |
Teacher Notes
1. Provide time for students to sign up for account. At that time, point out to students that as soon as they create a new padlet, the url for that padlet is in the url address box - that is what they need to share with you, if you are going to grade their online version. 2. Provide students a sandbox (practice) activity before starting real project - they will feel more comfortable with the tool - could be individual or group. Have them share the padlet with teacher, so that you know they correctly adjusted their settings. 3. Having students complete a planning sheet before they create a padlet will help them focus on content of padlet. Then time spent on padlet.com can focus on creating an effective visual product. *Storyboard planning sheet 4. A rubric provides clear expectations. Consider a weighted rubric for visual products. 5. Require at least one citation for an image (since it is a visual product). If they copy the padlet url into citationmachine.net, it will automatically create a citation for them to copy and paste. 6. Two ways the students can share their final product with you: *email you the padlet url for you to view online *take screen shot and then send you the screen shot in an email (this means less reliance on padlet.com working). |
Student Instructions you may want to include.
1. Think about which images and words would best communicate your message. It is a visual product, which means that the pictures are as important as the text. 2. Choose your words wisely – since this is a visual product, the few words used need to have the most impact. 3. If you are showing a process (step-by-step), number the tiles. 4. Arrange the tiles so that they are visually appealing. 5. Minimize the blank spaces between tiles by resizing and repositioning the tiles. 6. You can also change the wallpaper in settings. 7. Resize/rearrange your tiles so that the entire poster can be viewed on one screen. This means the viewer does not have to scroll down/across to see the entire poster. |
Additional Information
How to Use Padlet in the Classroom: A Fantastic Teaching Tool
3 Classroom Tools to Measure Student Learning
4 Free Web Tools to Boost Student Engagement
How to Use Padlet in the Classroom: A Fantastic Teaching Tool
3 Classroom Tools to Measure Student Learning
4 Free Web Tools to Boost Student Engagement
|
|
|
|
Padlet Samples
|
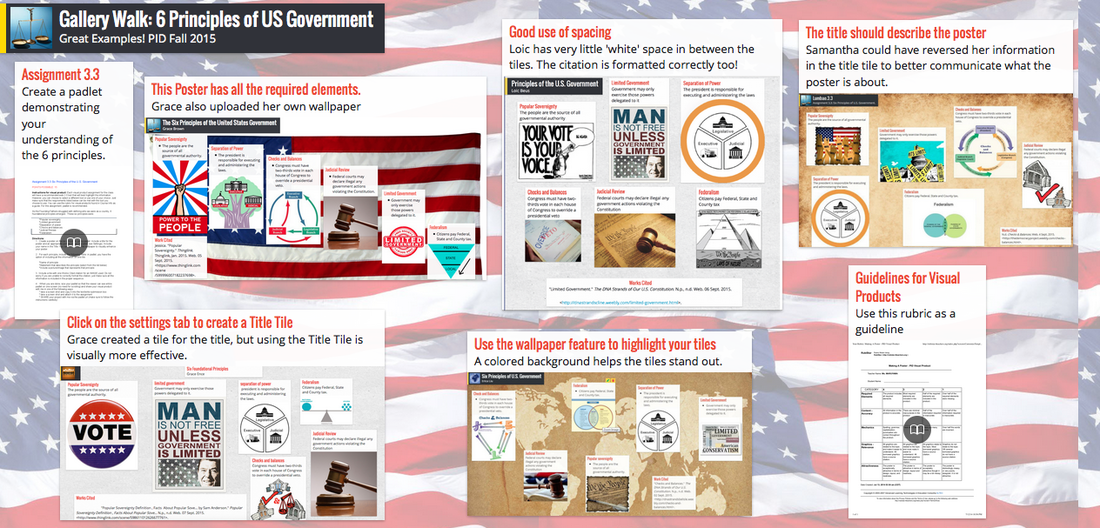
Student Work - Met
*used own wall paper appropriate to the topic *all requirements met (appropriate portrait with title, student name, Works Cited) 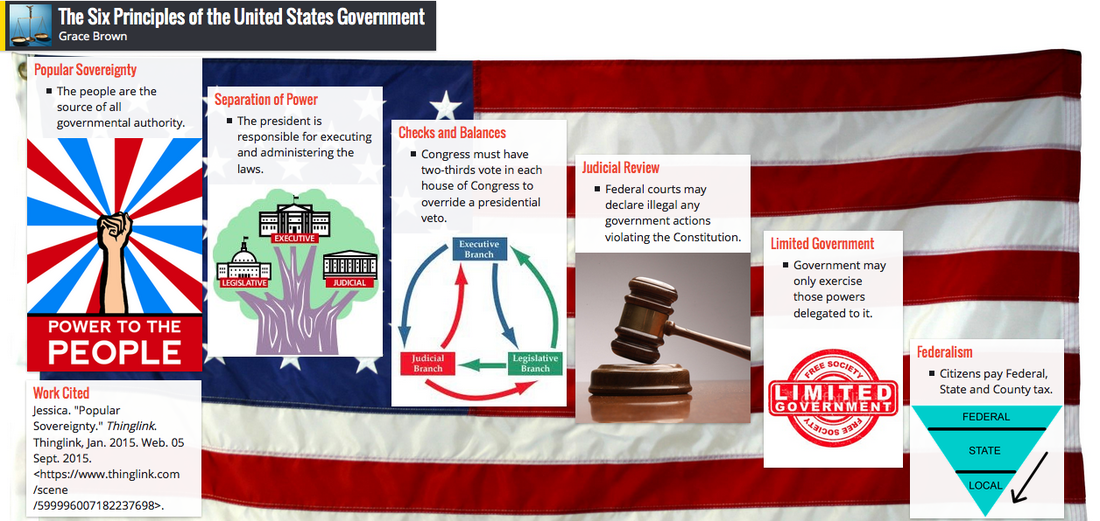
Student Work - Met
|
Student Work - Approaching
*while requirements met, does not necessarily enhance content (smiley portrait, 'green' background *too much white space 
|
Sandbox Activity - Let's Practice!
Activity 1 - Adding tiles
Possible purpose: student group work, exit pass
Go to this link: https://padlet.com/pideschool/w6rvnw5m06au
Double click and create a tile and share a SuperBowl idea
Activity 2 - Using Padlet in your class
1. Create your padlet account
2. Jot down possible ideas as a student product or as a teaching tool
You can use planning sheet to help your students (and you) organize thoughts and develop a plan of action
Create Your Padlet
1. Login to create a new padlet
2. Create a padlet with your ideas
Click here for detailed instructions
Padlet Requirements
*Title and Your Name
*At least 2 Tiles
*Try to include an image, video, audio for each tile
*Space your tiles so that 'white' space is minimized
*Space your tiles so that all the tiles can be viewed on the screen without scrolling
*When you are done, share a link with me: [email protected]
*Share our ideas